Featured image of post Flask轻松构建钉钉接口模版,实现自动化流程优化

Flask轻松构建钉钉接口模版,实现自动化流程优化

项目背景随着钉钉应用的不断普及和企业数字化程度的提高,越来越多的企业需要开发钉钉接口来完成内部业务流程的自动化和优化。而框架,则是一个轻量级的框架,具有快速开发和灵活性的优势,是钉钉接口开发的理想选择。。。。。。。

项目背景

随着钉钉应用的不断普及和企业数字化程度的提高,越来越多的企业需要开发钉钉接口来完成内部业务流程的自动化和优化。而Flask框架,则是一个轻量级的Python web框架,具有快速开发和灵活性的优势,是钉钉接口开发的理想选择。

简介

本博客将介绍如何使用Flask框架开发钉钉接口模版。通过本篇博客的学习,您将能够实现企业自定义机器人(Custom Bot)的基本功能,包括接收和发送消息,回复消息模版等。同时,我们也会提供完整的代码和相关技术文档,方便您在实际工作中快速实现自己的钉钉接口需求。

大致流程

环境搭建:安装Flask和钉钉SDK,并进行配置。 接口开发:编写接收和处理钉钉请求的API,并进行路由配置。 消息处理:解析钉钉请求的消息体,进行自定义消息的构建和发送。 模版回复:使用Jinja2模版引擎生成回复消息,并返回给钉钉服务端。 运行测试:运行Flask应用,并使用Postman等工具进行测试和调试。 以上仅是大致流程,具体实现步骤和技术细节会在博客中逐一详解。

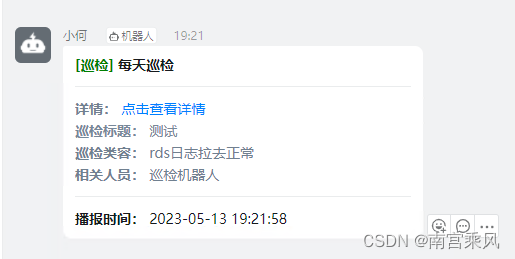
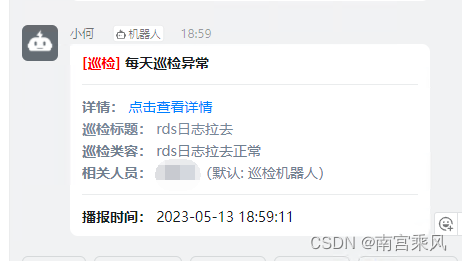
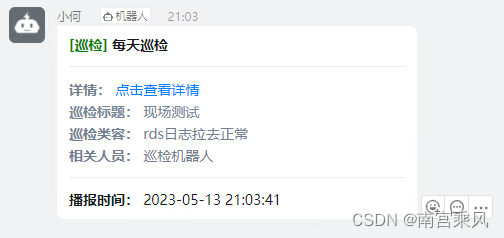
在这里插入图片描述 在这里插入图片描述 在这里插入图片描述

步骤流程

1、项目依赖

requirements.txt

 1
 2
 3
 4
 5
 6
 7
 8
 9
10
11
12
13
14
15
16
17
18
19
certifi==2023.5.7
charset-normalizer==3.1.0
click==8.1.3
colorama==0.4.6
DingtalkChatbot==1.5.7
docopt==0.6.2
Flask==2.2.5
idna==3.4
importlib-metadata==6.6.0
itsdangerous==2.1.2
Jinja2==3.1.2
MarkupSafe==2.1.2
pipreqs==0.4.13
requests==2.30.0
typing_extensions==4.5.0
urllib3==1.26.5
Werkzeug==2.2.3
yarg==0.1.9
zipp==3.15.0

2、工具类

utils/send_ding.py

 1
 2
 3
 4
 5
 6
 7
 8
 9
10
11
12
13
14
15
16
17
18
19
20
21
22
23
24
25
26
27
28
29
30
31
32
33
34
35
36
37
38
39
40
41
42
43
44
45
46
47
48
49
50
51
52
53
54
55
56
57
58
59
60
61
62
63
64
65
66
# -*- coding: utf-8 -*-
# @Time    : 2023/5/13 19:16
# @Author  : 南宫乘风
# @Email   : 1794748404@qq.com
# @File    : send_ding.py
# @Software: PyCharm
# -*- coding: utf-8 -*-
# @Time    : 2023/5/13 13:44
# @Author  : 南宫乘风
# @Email   : 1794748404@qq.com
# @File    : send_dingding.py
# @Software: PyCharm
"""
发送钉钉的api接口消息验证
"""

# https://oapi.dingtalk.com/robot/send?access_token=xxx

# 加密 xxxx


import time
import hmac
import hashlib
import base64
import urllib.parse

import requests

secret = 'xxxx 加密秘钥'
secret_enc = secret.encode('utf-8')
access_token = 'token'


def generate_timestamp():
    """获取当前时间戳"""
    return str(round(time.time() * 1000))


def generate_sign(secret_enc, timestamp):
    """生成签名"""
    string_to_sign = '{}\n{}'.format(timestamp, secret)
    string_to_sign_enc = string_to_sign.encode('utf-8')
    hmac_code = hmac.new(secret_enc, string_to_sign_enc, digestmod=hashlib.sha256).digest()
    sign = urllib.parse.quote_plus(base64.b64encode(hmac_code))
    return sign


def main():
    timestamp = generate_timestamp()
    sign = generate_sign(secret_enc, timestamp)

    # 构造请求 URL
    url = 'https://oapi.dingtalk.com/robot/send?access_token={}&timestamp={}&sign={}'.format(access_token, timestamp,
                                                                                             sign)
    content = 'Hello, World!'
    # 构造请求 headers 和 body
    headers = {'Content-Type': 'application/json'}
    payload = {'msgtype': 'text', 'text': {'content': content}}
    # 发送请求并返回响应结果
    response = requests.post(url, json=payload, headers=headers)
    print(response.text)


if __name__ == '__main__':
    main()

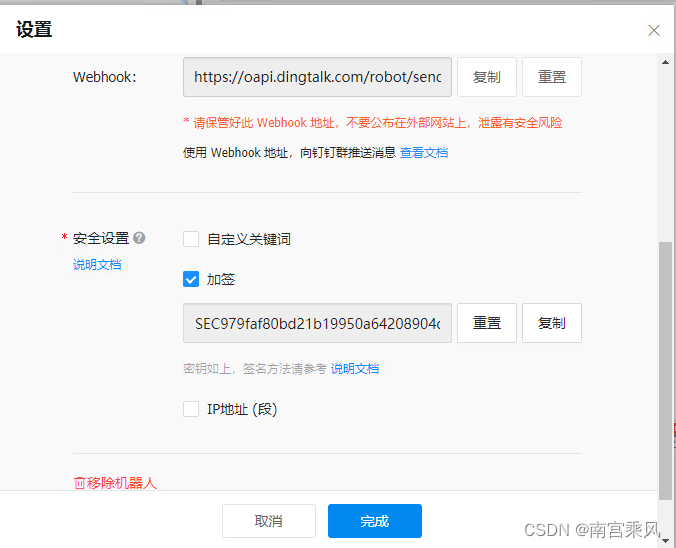
在这里插入图片描述

3、Flask接口

  1
  2
  3
  4
  5
  6
  7
  8
  9
 10
 11
 12
 13
 14
 15
 16
 17
 18
 19
 20
 21
 22
 23
 24
 25
 26
 27
 28
 29
 30
 31
 32
 33
 34
 35
 36
 37
 38
 39
 40
 41
 42
 43
 44
 45
 46
 47
 48
 49
 50
 51
 52
 53
 54
 55
 56
 57
 58
 59
 60
 61
 62
 63
 64
 65
 66
 67
 68
 69
 70
 71
 72
 73
 74
 75
 76
 77
 78
 79
 80
 81
 82
 83
 84
 85
 86
 87
 88
 89
 90
 91
 92
 93
 94
 95
 96
 97
 98
 99
100
101
102
103
# -*- coding: utf-8 -*-
# @Time    : 2023/5/13 19:15
# @Author  : 南宫乘风
# @Email   : 1794748404@qq.com
# @File    : app.py
# @Software: PyCharm
import datetime
import json
from time import strftime
from utils.send_ding import access_token, generate_timestamp, generate_sign, secret_enc
from dingtalkchatbot.chatbot import DingtalkChatbot
import datetime
from flask import Flask, render_template, request, jsonify

app = Flask(__name__)


def generate_text_info(url, title, context, author):
    t = datetime.datetime.now().strftime('%Y-%m-%d %H:%M:%S')
    text = ('''<font color=\'#008000\'><b>[巡检]</b> </font><b>每天巡检</b>'''
            + '''\n\n --- \n\n'''
            + '''<font color=\'#708090\' size=2><b>详情:</b>   [点击查看详情](%s)</font> \n\n '''
            + '''<font color=\'#778899\' size=2><b>巡检标题:</b> %s</font> \n\n '''
            + '''<font color=\'#708090\' size=2><b>巡检类容:</b> %s</font> \n\n '''
            + '''<font color=\'#708090\' size=2><b>相关人员:</b> %s</font>'''
            + '''\n\n --- \n\n'''
            + '''<b>播报时间:</b> %s''') % (url, title, context, author, t)
    return text


def generate_text_error(url, title, context, author):
    t = datetime.datetime.now().strftime('%Y-%m-%d %H:%M:%S')
    text = ('''<font color=\'#FF0000\'><b>[巡检]</b> </font><b>每天巡检异常</b>'''
            + '''\n\n --- \n\n'''
            + '''<font color=\'#708090\' size=2><b>详情:</b>   [点击查看详情](%s)</font> \n\n '''
            + '''<font color=\'#778899\' size=2><b>巡检标题:</b> %s</font> \n\n '''
            + '''<font color=\'#708090\' size=2><b>巡检类容:</b> %s</font> \n\n '''
            + '''<font color=\'#708090\' size=2><b>相关人员:</b> %s</font>'''
            + '''\n\n --- \n\n'''
            + '''<b>播报时间:</b> %s''') % (url, title, context, author, t)
    return text


def send_dingtalk_msg(title, wehook, text):
    ddrobot = DingtalkChatbot(wehook)
    ret = ddrobot.send_markdown(title, text=text, is_at_all=False)
    return ret


def dingtalk_robot(url, title, content, author, level):
    timestamp = generate_timestamp()
    sign = generate_sign(secret_enc, timestamp)
    # 构造请求 URL
    wehook = 'https://oapi.dingtalk.com/robot/send?access_token={}&timestamp={}&sign={}'.format(access_token, timestamp,
                                                                                                sign)
    # wehook = 'https://oapi.dingtalk.com/robot/send?access_token=paste_your_token_from_dingtalk'
    if level == "info":
        text = generate_text_info(url, title, content, author)
    else:
        text = generate_text_error(url, title, content, author)
    result = send_dingtalk_msg(title, wehook, text)
    return result


message = {
    'msg': '请按照上面格式 post 请求参数(source(认证) title(标题) content(内容) 必选参数)',
    'data': {'source': 'heian', 'title': 'rds日志拉去', 'content': 'rds日志拉去正常',
             'level': 'info|error (默认: info)',
             'author': '南宫乘风(默认: 巡检机器人)'}
}


@app.route('/ding/send', methods=['POST', "GET"])
def send():
    if request.method == 'GET':

        return jsonify(message)
    else:
        json_data = request.get_json()
        source = json_data.get('source')
        title = json_data.get('title')
        content = json_data.get('content')
        level = json_data.get('level', 'info')
        author = json_data.get('author', '巡检机器人')
        if not source or not title or not content:
            return jsonify(message)
        if source != 'heian':
            return "认证失败,请联系运维人员!"
        else:
            # 在这里处理传入的参数
            url = 'http://127.0.0.1:5000/'
            result = dingtalk_robot(url, title, content, author, level)
            # print(result)
            if result['errcode'] == 0:
                print('消息发送成功!')
                return "消息发送成功!"
            else:
                print('消息发送失败:', result['errmsg'])
                return f"消息发送失败, {result['errmsg']}"


if __name__ == '__main__':
    app.run(debug=True)

项目测试

1、启动Flask

在这里插入图片描述

2、访问接口

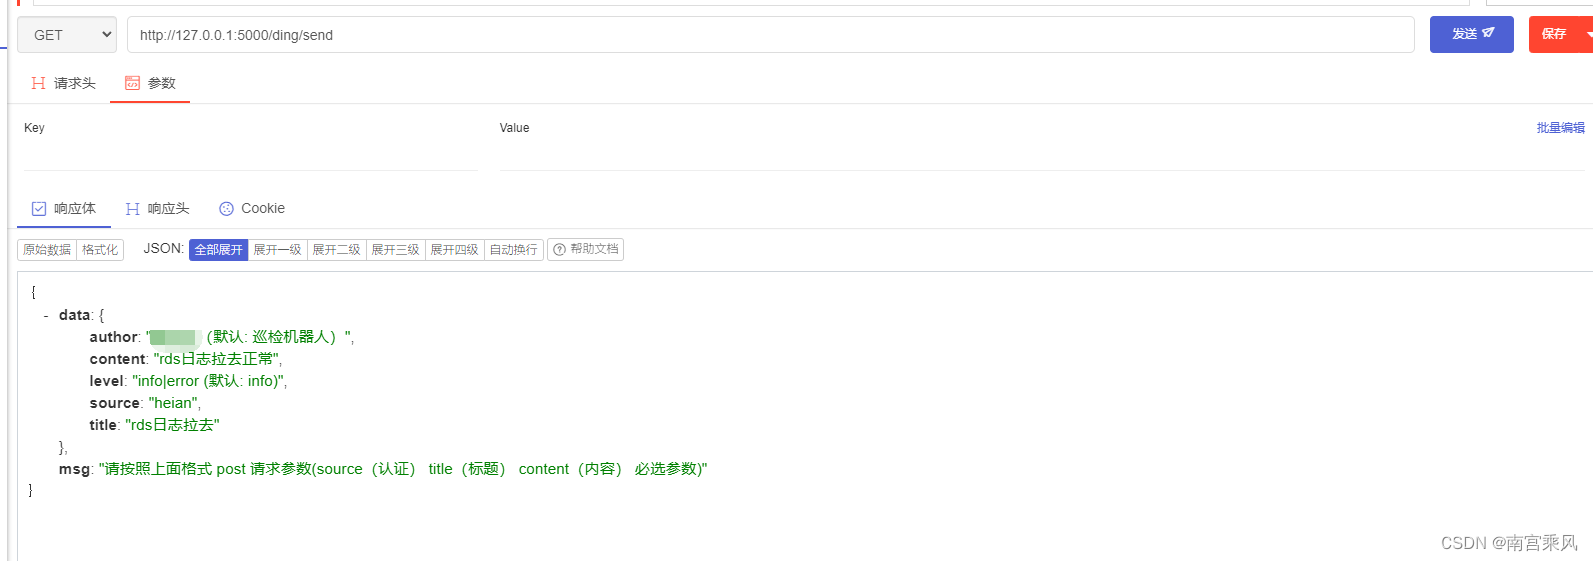
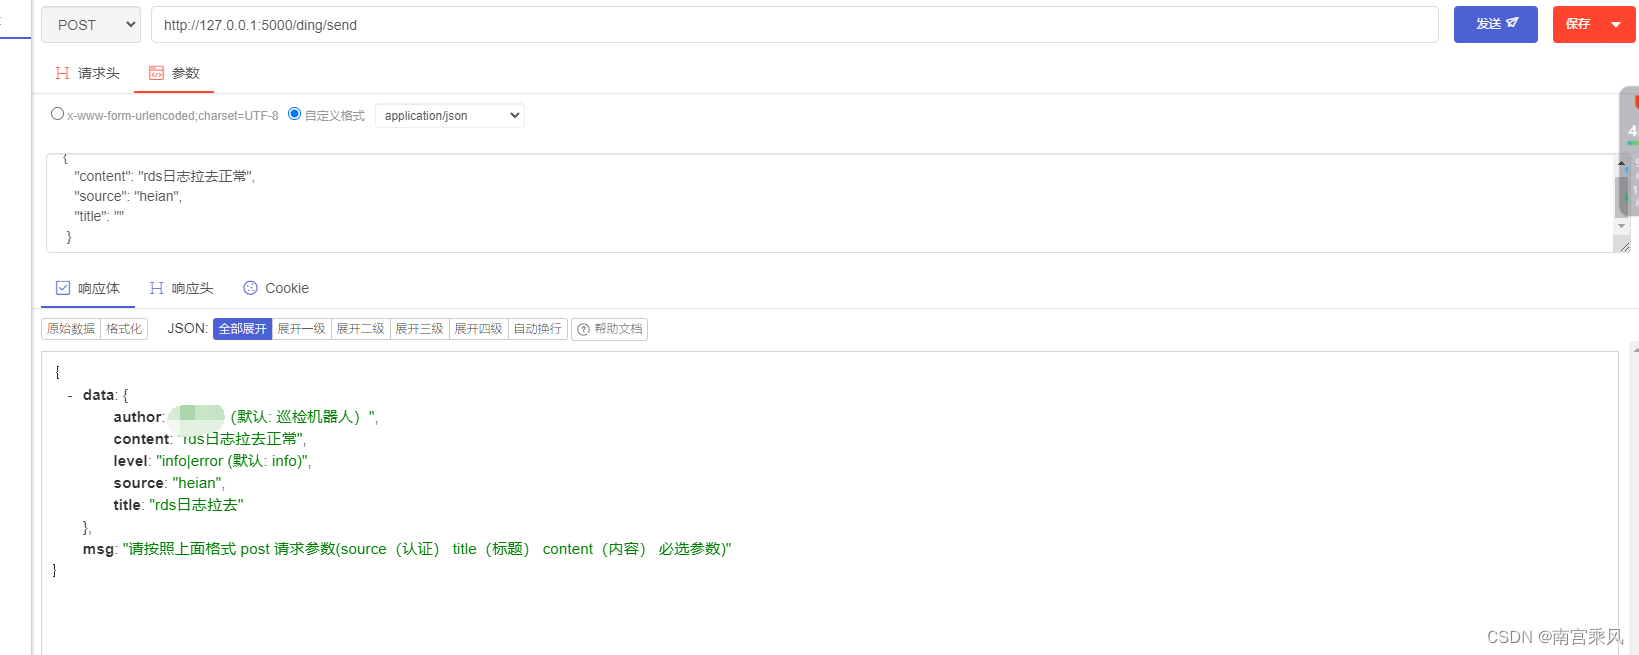
http://127.0.0.1:5000/ding/send

GET请求 POST请求 参数:

1
2
3
4
5
6
7
{
"author": "南宫乘风(默认: 巡检机器人)",
"content": "rds日志拉去正常",
"level": "info|error (默认: info)",
"source": "heian",
"title": "rds日志拉去"
}

在这里插入图片描述 在这里插入图片描述 传入JSON数据不对 在这里插入图片描述